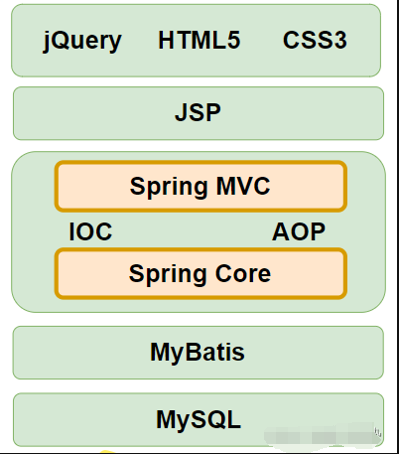
【SSM进阶学习系列丨整合篇】Spring+SpringMVC+MyBatis 框架配置详解
文章目录
- 一、环境准备
- 1.1、创建数据库和表
- 1.2、导入框架依赖的jar包
- 1.3、修改Maven的编译版本
- 1.4、完善Maven目录
- 1.5、编写项目需要的包
- 1.6、编写实体、Mapper、Service
- 二、配置MyBatis环境
- 2.1、配置mybatis的主配置文件
- 2.2、编写映射文件
- 2.3、测试环境是否正确
- 三、配置Spring环境
- 3.1、编写主配置文件
- 3.2、测试Spring环境是否正确
- 四、Spring整合MyBaits框架
- 4.1、定义数据库配置
- 4.2、主配置文件中引入properties配置文件
- 4.3、注册数据源
- 4.4、定义事务管理器
- 4.5、开启事务的注解驱动支持
- 4.6、配置SqlSessionFactoryBean
- 4.7、配置自动扫描所有 Mapper 接口和文件
- 4.8、测试
- 五、配置SpringMVC环境
- 5.1、主配置文件
- 5.2、web.xml配置前端控制器
- 六、Spring集成SpringMVC环境
一、环境准备
1.1、创建数据库和表
create database ssm;
use ssm;
create table t_account(
	id int primary key auto_increment,
  	name varchar(30),
  	age int,
  	balance int
);
insert into t_account values(default,'HelloWorld',23,100);
1.2、导入框架依赖的jar包
由于我们整合的是SpringMVC、Spring和MyBatis,所以需要将这三个框架所需要的jar包导入到项目中。注意:由于要连接数据库,所以仍需要数据库驱动包。
注意:MyBatis框架和Spring框架整合需要一个mybatis-spring的jar包,该jar包的作用是两个框架的转换包。
       org.mybatis
       mybatis
       3.5.3


      	mysql
        mysql-connector-java
        5.1.6


       	org.springframework
        spring-context
        5.2.1.RELEASE


        org.aspectj
        aspectjweaver
        1.9.4


        org.springframework
        spring-tx
        5.2.1.RELEASE


      org.springframework
      spring-jdbc
      5.2.1.RELEASE


      org.springframework
      spring-web
      5.2.1.RELEASE


      org.springframework
      spring-webmvc
      5.2.1.RELEASE


      com.fasterxml.jackson.core
      jackson-core
      2.9.5


      com.fasterxml.jackson.core
      jackson-annotations
      2.9.5


      com.fasterxml.jackson.core
      jackson-databind
      2.9.5


          javax.servlet
          javax.servlet-api
          3.1.0
          provided


      javax.servlet
      jstl
      1.2


      commons-fileupload
      commons-fileupload
      1.3.1


      commons-io
      commons-io
      2.4


        log4j
        log4j
        1.2.17


        org.springframework
        spring-test
        5.2.1.RELEASE
        test


        junit
        junit
        4.12
        test


        org.mybatis
        mybatis-spring
        2.0.3


      com.alibaba
      druid
      1.1.21
1.3、修改Maven的编译版本
    UTF-8
    1.8
    1.8
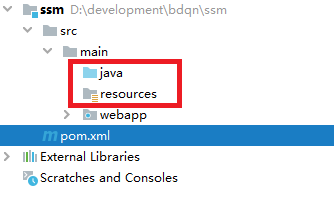
1.4、完善Maven目录
1.5、编写项目需要的包
cn.bdqn.domain
cn.bdqn.mapper
cn.bdqn.service
cn.bdqn.controller
cn.bdqn.utils
cn.bdqn.exception
1.6、编写实体、Mapper、Service
public class Account {

    private int id;

    private String name;

    private Integer age;

    private Integer balance;
	// 生成get和set方法、toString方法
}
public interface AccountMapper { // 查询所有的账号 public List selectAll(); // 保存账号 public void insert(Account account); }public interface AccountService { // 查询所有账号 public List queryAll(); // 保存账号 public void save(Account account); }public class AccountServiceImpl implements AccountService { // 查询全部账号 public List queryAll() { System.out.println("查询全部账号"); return null; } // 保存账号 public void save(Account account) { System.out.println("保存账号"); } }二、配置MyBatis环境
2.1、配置mybatis的主配置文件
主配置文件:mybaits-config.xml.
2.2、编写映射文件
在resources目录下新建与mapper接口同名的目录。即:cn/bdqn/mapper
        select
            id,name,age,balance
        from
            t_account


        insert into t_account(name,age,balance) values (#{name},#{age},#{balance})
2.3、测试环境是否正确
    @Test
    public void testMyBatis() throws Exception{
        InputStream is = Resources.getResourceAsStream("mybatis-config.xml");
        SqlSessionFactory ssf = new SqlSessionFactoryBuilder().build(is);
        SqlSession session = ssf.openSession();
        AccountMapper accountMapper = session.getMapper(AccountMapper.class);
        List accounts = accountMapper.selectAll();
        System.out.println(accounts);
        is.close();
        session.close();
    }
三、配置Spring环境
3.1、编写主配置文件
注意:由于是SSM项目整合,在Spring主配置文件中配置扫描包的时候仅仅针对Service业务层、Mapper持久化层等注解的扫描,对于Web层,交由SpringMVC框架去处理。
3.2、测试Spring环境是否正确
    @Test
    public void testSpring() throws Exception{
        ApplicationContext ac = new ClassPathXmlApplicationContext("beans.xml");
        AccountService accountService = (AccountService) ac.getBean("accountService");
        System.out.println(accountService);
    }
四、Spring整合MyBaits框架
注意:我们在配置MyBaits环境的时候,数据源配置在了MyBatis上,现在由于Spring整合MyBaits,则对于在MyBatis中配置的数据源要交给Spring去管理。在这里,我们用的阿里巴巴的数据源。
官网
4.1、定义数据库配置
定义db.properties数据库配置文件
jdbc.driver=com.mysql.jdbc.Driver
jdbc.url=jdbc:mysql:///ssm?allowMultiQueries=true
jdbc.username=root
jdbc.password=1234567
4.2、主配置文件中引入properties配置文件
4.3、注册数据源
4.4、定义事务管理器
4.5、开启事务的注解驱动支持
4.6、配置SqlSessionFactoryBean
4.7、配置自动扫描所有 Mapper 接口和文件
4.8、测试
    @Test
    public void testSpringAndMyBatis() throws Exception{
        ApplicationContext ac =  new ClassPathXmlApplicationContext("beans.xml");
        AccountService accountService = (AccountService) ac.getBean("accountService");
        List accounts = accountService.queryAll();
        System.out.println(accounts);
    }
五、配置SpringMVC环境
5.1、主配置文件
5.2、web.xml配置前端控制器
    frontDispatcherServlet
    org.springframework.web.servlet.DispatcherServlet

      contextConfigLocation
      classpath:SpringMVC.xml

    1


    frontDispatcherServlet
    /
六、Spring集成SpringMVC环境
在web.xml文件中配置。
    org.springframework.web.context.ContextLoaderListener


    contextConfigLocation
    classpath:beans.xml
免责声明:我们致力于保护作者版权,注重分享,被刊用文章因无法核实真实出处,未能及时与作者取得联系,或有版权异议的,请联系管理员,我们会立即处理!
部分文章是来自自研大数据AI进行生成,内容摘自(百度百科,百度知道,头条百科,中国民法典,刑法,牛津词典,新华词典,汉语词典,国家院校,科普平台)等数据,内容仅供学习参考,不准确地方联系删除处理!
图片声明:本站部分配图来自人工智能系统AI生成,觅知网授权图片,PxHere摄影无版权图库和百度,360,搜狗等多加搜索引擎自动关键词搜索配图,如有侵权的图片,请第一时间联系我们,邮箱:ciyunidc@ciyunshuju.com。本站只作为美观性配图使用,无任何非法侵犯第三方意图,一切解释权归图片著作权方,本站不承担任何责任。如有恶意碰瓷者,必当奉陪到底严惩不贷!


