【map、set】C++用红黑树来封装map、set容器

🎉博主首页: 有趣的中国人
🎉专栏首页: C++进阶
🎉其它专栏: C++初阶 | Linux | 初阶数据结构
小伙伴们大家好,本片文章将会讲解map和set之用红黑树来封装map、set容器的相关内容。
如果看到最后您觉得这篇文章写得不错,有所收获,麻烦点赞👍、收藏🌟、留下评论📝。您的支持是我最大的动力,让我们一起努力,共同成长!
文章目录
- `0. 前言`
- `1. map、set底层源码一览`
- ==⌛底层查看⏳==
- `2. 改造红黑树`
- ==⏳map类和set类⌛==
- ==⏳仿函数,这思想很重要⌛==
- ==⏳第一个K的作用⌛==
- `3. 迭代器的模拟实现`
- ==⏳迭代器++⌛==
- ==⏳迭代器- -⌛==
- `4. map的operator[]`
- `5. 拷贝构造、析构、赋值重载`
- ==⏳析构函数⌛==
- ==⏳拷贝构造⌛==
- ==⏳赋值重载⌛==
0. 前言
首先借用某位大佬的一句话:学习制造轮子不是为了打造更出色的轮子,而是为了汲取大师们卓越的思想,以此启迪我们的认知与创造力。
1. map、set底层源码一览
我们在模拟红黑树的时候一律用了pair的KV模型来进行实现。但是由于map是KV模型的而set是K型的,但是底层都是用的红黑树,那么应该如何进行调整呢?
⌛底层查看⏳
可以看到,对于K类型的set,模板传入了两个相同的K类型给RBTree;对于KV类型的map,模板传入了一个K,还有一个pair类型给RBTree。
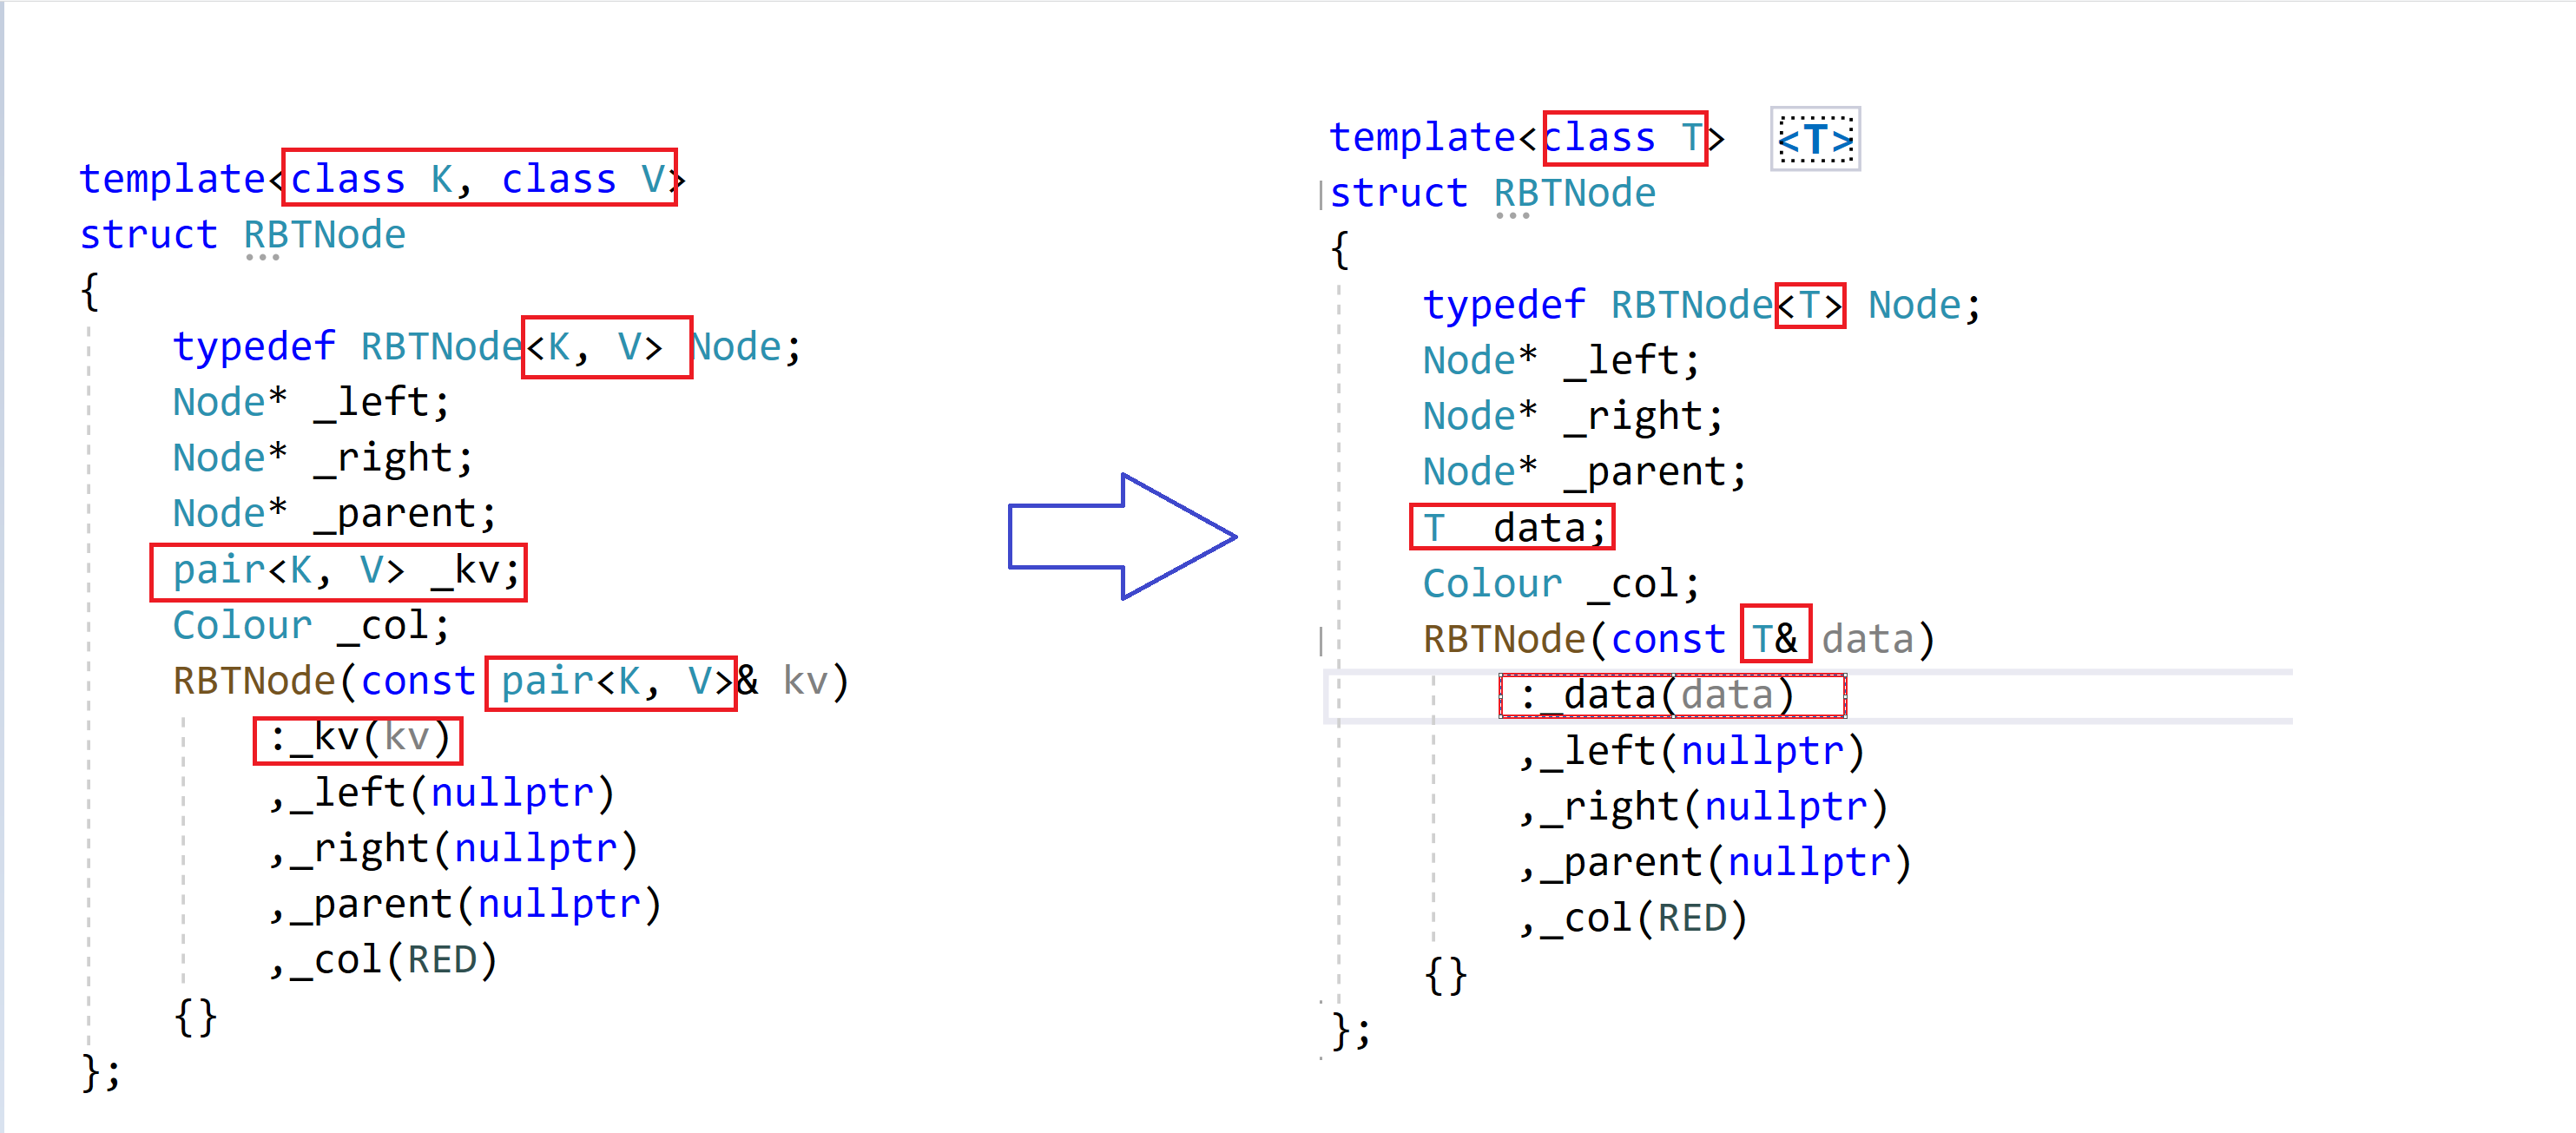
在RBTree类中将第二个模板参数传入给RBTreeNode,data的数据类型为就是此类型,这样就解决了此问题。
2. 改造红黑树
⏳map类和set类⌛
我们先按照底层的思路实现以下map类和set类:
// mymap.h
#pragma once
#include "RBTtree.h"
namespace dsj
{
	template
	class map
	{
	public:
	private:
		// pair 为节点中的参数类型
		RBTree rt;
	};
}
// myset.h
#pragma once
#include "RBTtree.h"
namespace dsj
{
	template
	class set
	{
	public:
	private:
		// 第二个 K 为节点中的参数类型
		RBTree rt;
	};
}
💻RBTreeNode的修改
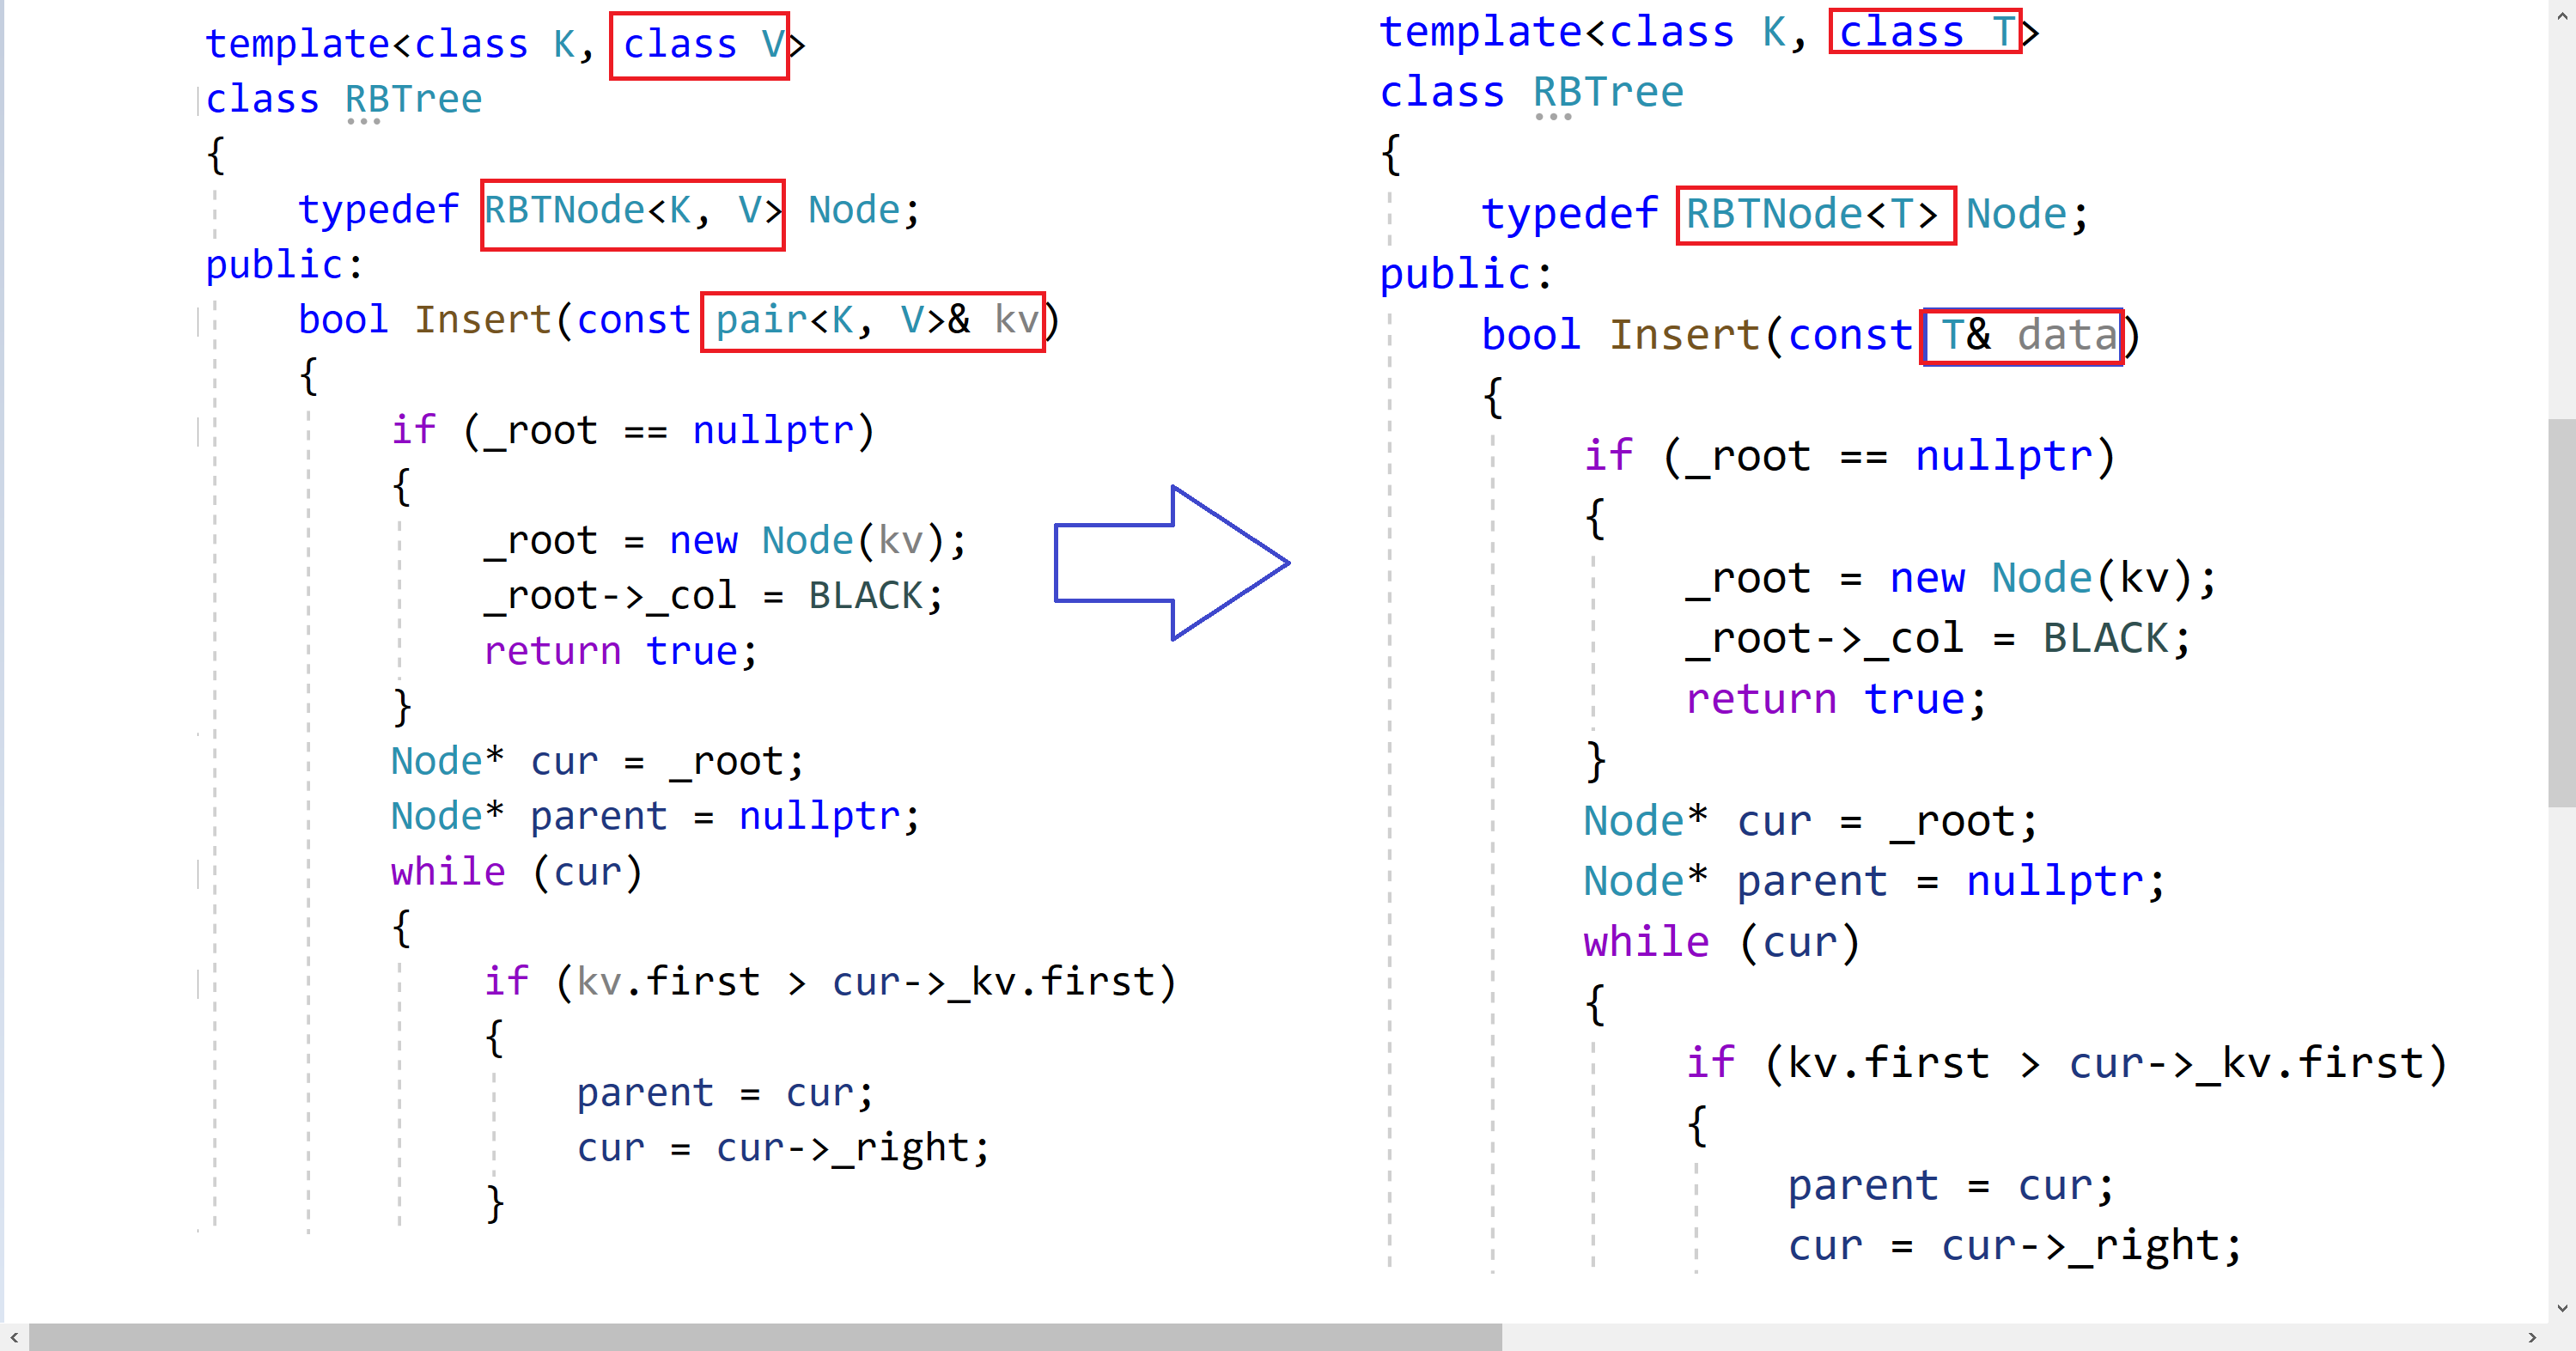
💻RBTree的修改
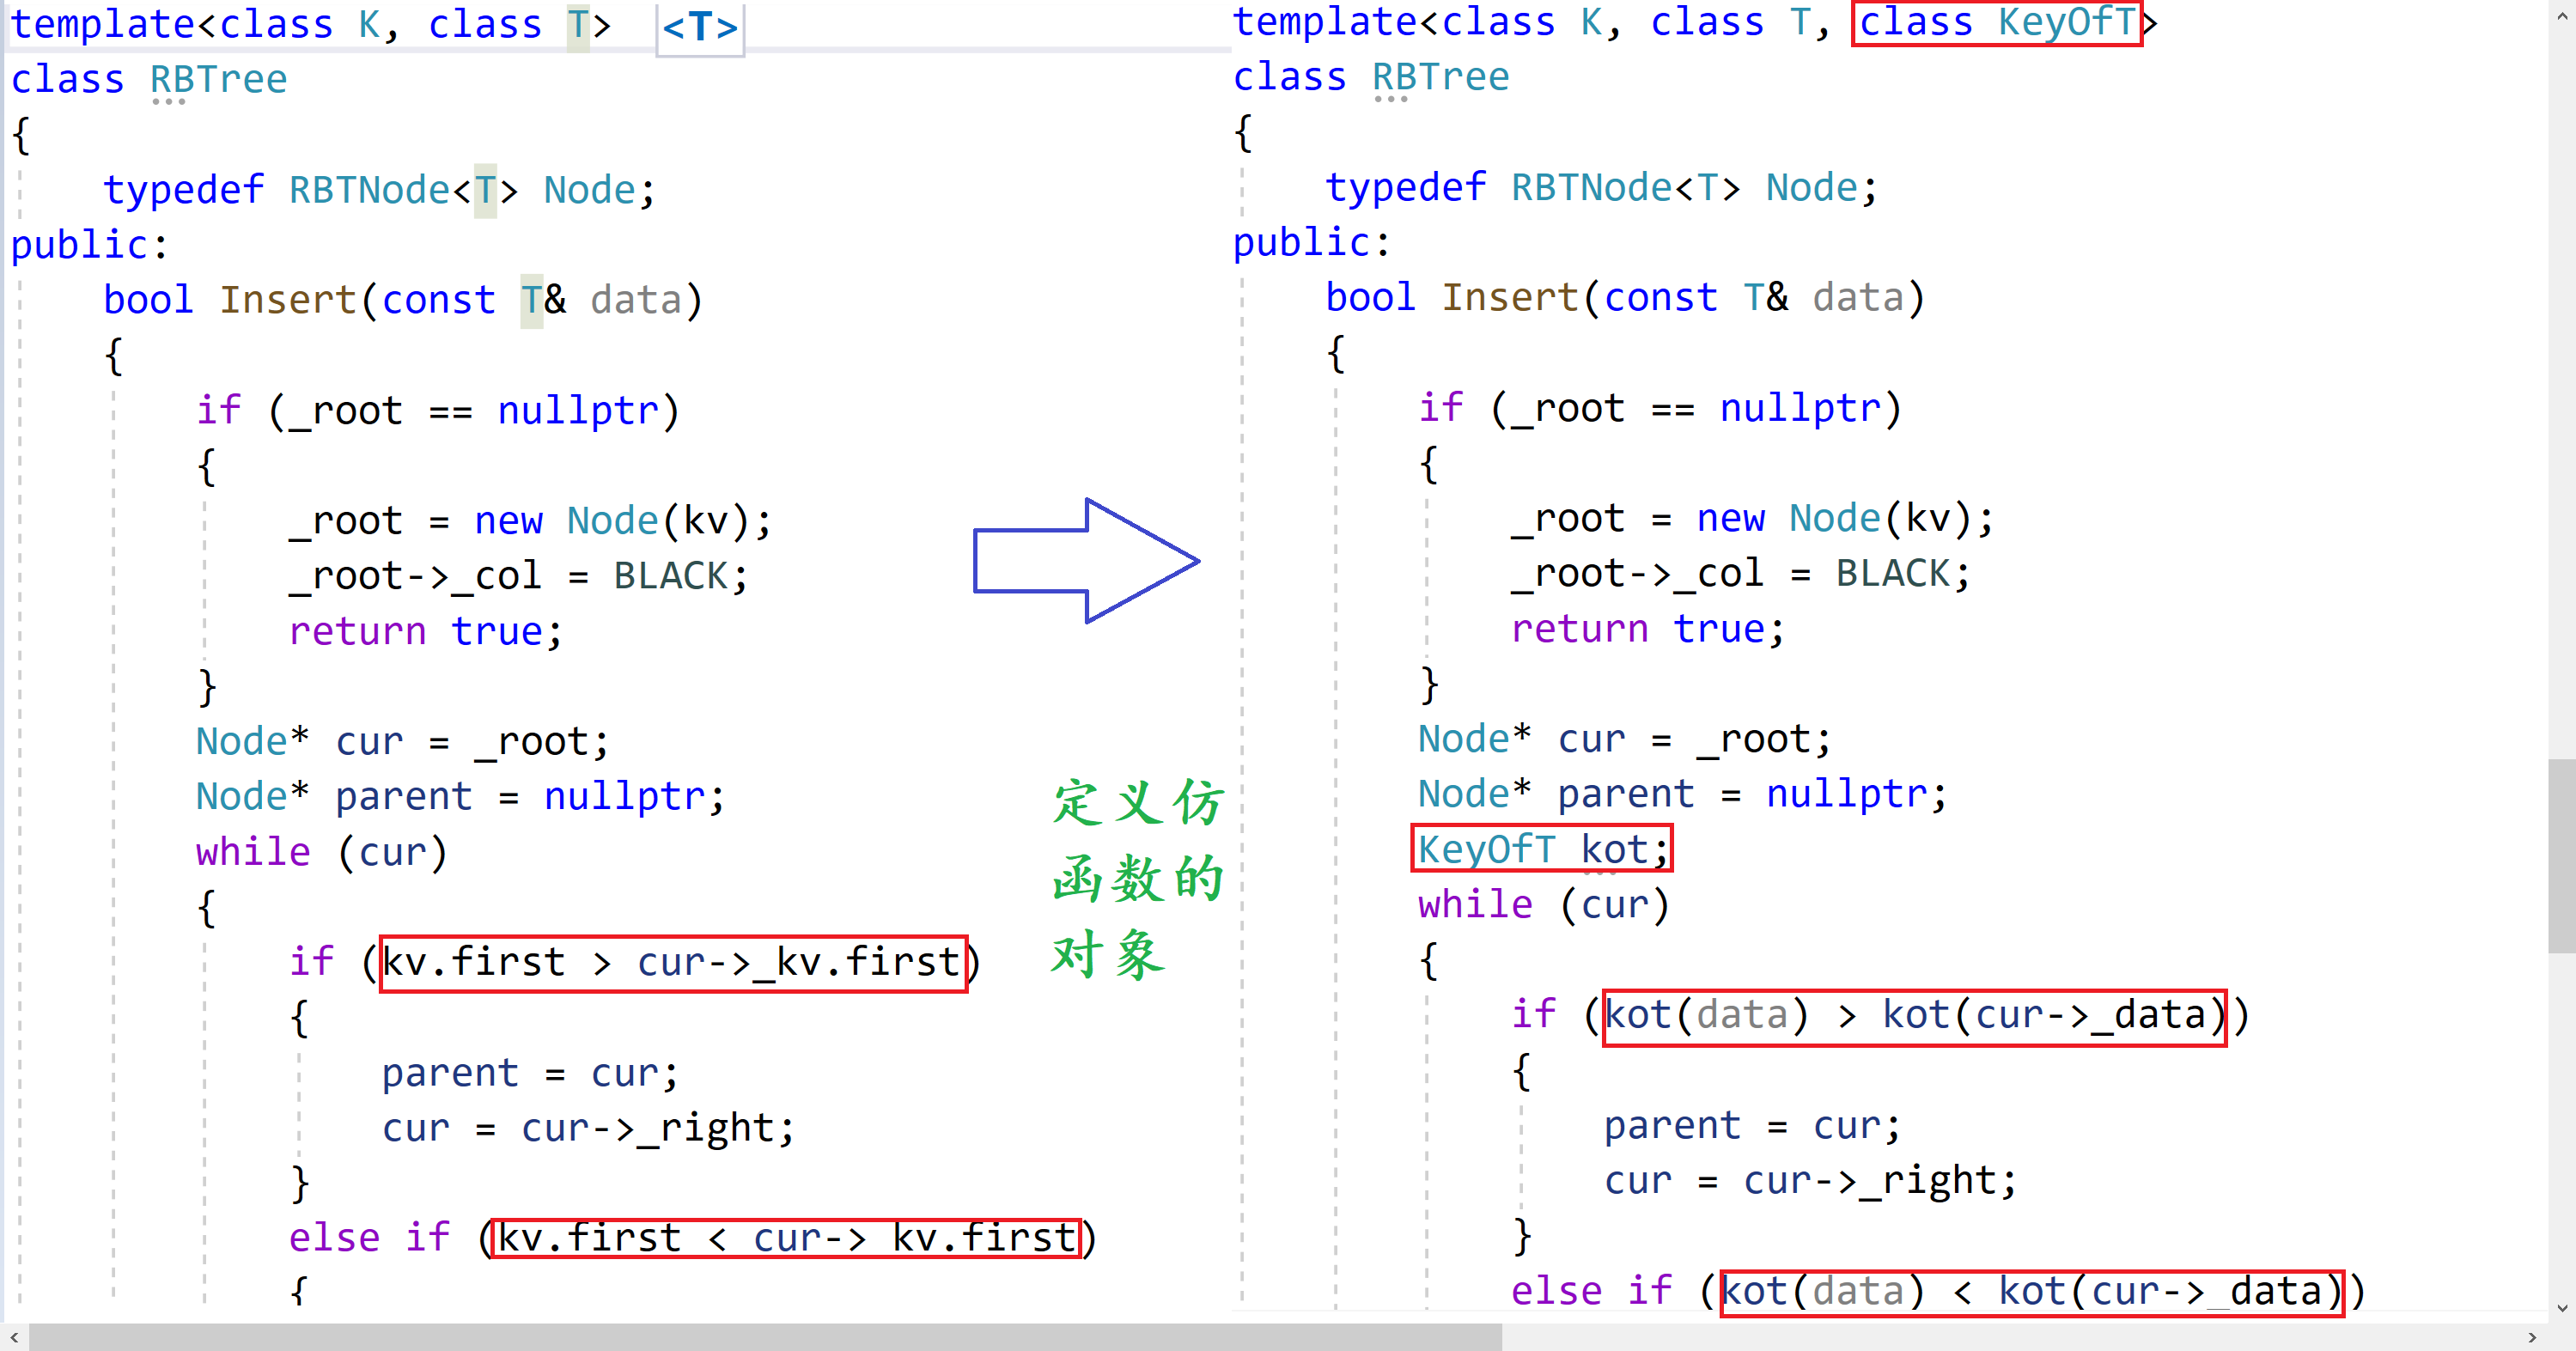
这样一改,问题就来了,在我们插入数据的时候,如何根据插入节点的K值来判断他插入所在的位置呢?如何进行比较?
可以用仿函数来进行比较。
⏳仿函数,这思想很重要⌛
虽然在RBTree中并不知道如何进行比较,但是在map和set类中知道如何进行比较,即map用pair的first进行比较,set直接用K值进行比较,实现方法如下:
// mymap.h
namespace dsj
{
	// 仿函数
	template
	struct mapKeyOfT
	{
		// 取pair的first
		const K& operator()(const pair& kv)
		{
			return kv.first;
		}
	};
	template
	class map
	{
	public:
	private:
		// 多加一个仿函数模板参数,对于map,取pair的first进行比较
		RBTree rt;
	};
}
// myset.h
namespace dsj
{
	// 仿函数
	template
	struct setKeyOfT
	{
		// 取出key
		const K& operator()(const K& key)
		{
			return key;
		}
	};
	template
	class set
	{
	public:
	private:
		// 多加一个仿函数模板参数,对于set,直接对K值进行比较
		RBTree rt;
	};
}
⏳第一个K的作用⌛
有一个问题,给红黑树传模板参数的时候,第一个参数K类型的作用是什么呢?
1. 对于insert来说,set和map都可以不要第一个模板参数K,因为set中第二个模板参数是K,可以用来进行插入时的比较,对于map,也是用第二个模板参数来进行比较;
2. 但是对于find接口,他就需要K;
3. 迭代器的模拟实现
通过list的迭代器,我们知道如果原生指针的效果达不到我们想要的效果,就通过封装迭代器,再用运算符重载来达到我们预期的效果。
模拟实现:
template
struct __RBTIterator
{
	typedef RBTNode Node;
	typedef __RBTIterator Self;
	Node* _node;

	__RBTIterator(Node* node)
		:_node(node)
	{}
	T operator*()
	{
		return _node->_data;
	}
	T* operator->()
	{
		return &_node->_data;
	}
	bool operator!=(const Self& s)
	{
		return _node != s._node;
	}
};
我们在模拟实现list的迭代器的时候讲过,对于const迭代器和普通迭代器,他们只有解引用和->的的返回值不一样,其他都相同,如果重新写一遍那么代码肯定非常冗余,因此我们这里还用类似的方法来实现(传入模板参数)。
改造后:
template
struct __RBTIterator
{
	typedef RBTNode Node;
	typedef __RBTIterator Self;
	Node* _node;
	__RBTIterator(Node* node)
		:_node(node)
	{}
	Ref operator*()
	{
		return _node->_data;
	}
	Ptr operator->()
	{
		return &_node->_data;
	}
	bool operator!=(const Self& s)
	{
		return _node != s._node;
	}
};
RBTree中:
// 编译器自动推演,根据类型调用对应的迭代器
typedef __RBTIterator Iterator;
typedef __RBTIterator Const_Iterator;
Iterator begin()
{
	Node* leftMin = _root;
	// 加上leftMin是为了预防_root为空的情况
	if (leftMin && leftMin->_left)
	{
		leftMin = leftMin->_left;
	}
	return Iterator(leftMin);
}
Iterator End()
{
	return Iterator(nullptr);
}
Const_Iterator begin() const
{
	Node* leftMin = _root;
	if (leftMin && leftMin->_left)
	{
		leftMin = leftMin->_left;
	}
	return Const_Iterator(leftMin);
}
Const_Iterator End() const
{
	return Const_Iterator(nullptr);
}
map和set中:
template
class map
{
public:
	typedef typename RBTree::Iterator iterator;
	typedef typename RBTree::Const_Iterator const_iterator;
	const_iterator begin() const
	{
		return rt.Begin();
	}
	const_iterator end() const
	{
		return rt.End();
	}
	iterator begin()
	{
		return rt.Begin();
	}
	iterator end()
	{
		return rt.End();
	}
private:
	RBTree rt;
};
template
class set
{
public:
	typedef typename RBTree::Iterator iterator;
	typedef typename RBTree::Const_Iterator const_iterator;
	const_iterator beign() const
	{
		return rt.Begin();
	}
	const_iterator end() const
	{
		return rt.End();
	}
	iterator beign()
	{
		return rt.Begin();
	}
	iterator end()
	{
		return rt.End();
	}
private:
	RBTree rt;
};
调用逻辑:
⏳迭代器++⌛
set和map迭代器的++按照中序遍历的顺序进行加加的,顺序为:左子树 根 右子树。
逻辑如下:
- 右子树存在,下一个访问节点是右子树的最左节点;
- 右子树不存在,向上找,找到孩子是父亲左节点的那个祖先节点。
代码:
Self& operator++()
{
	Node* cur = _node;
	if (cur->_right)
	{
		Node* rightMin = cur->_right;
		while (rightMin->_left)
		{
			rightMin = rightMin->_left;
		}
		_node = rightMin;
	}
	else
	{
		Node* parent = cur->_parent;
		// 这里加parent是为了预防访问最右节点后parent为空的情况
		while (parent && cur == parent->_right)
		{
			cur = parent;
			parent = cur->_parent;
		}
		_node = parent;
	}
	return *this;
}
⏳迭代器- -⌛
思路同上,但是顺序相反:右子树 根 左子树。
逻辑如下:
- 左子树存在,下一个访问节点是左子树的最右节点;
- 左子树不存在,向上找,找到孩子是父亲右节点的那个祖先节点。
代码:
Self& operator--()
{
	if (_node->_left)
	{
		Node* cur = _node->_left;
		while (cur->_right)
		{
			cur = cur->_right;
		}
		_node = cur;
	}
	else
	{
		Node* cur = _node;
		Node* parent = cur->_parent;
		while (parent && cur == parent->_left)
		{
			cur = parent;
			parent = cur->_parent;
		}
		_node = parent;
	}
	return *this;
}
4. map的operator[]
map的operator[]的用法在之前的文章中讲过,它的作用是根据key的值进行查找,如果存在,那么就返回当前节点的value,如果不存在,就先插入此节点,然后再返回这个节点的value。
实现代码:
V& operator[](const K& key)
{
	pair ret = rt.Insert(make_pair(key,V()));
	return ret.first->second;
}
Insert函数修改逻辑:
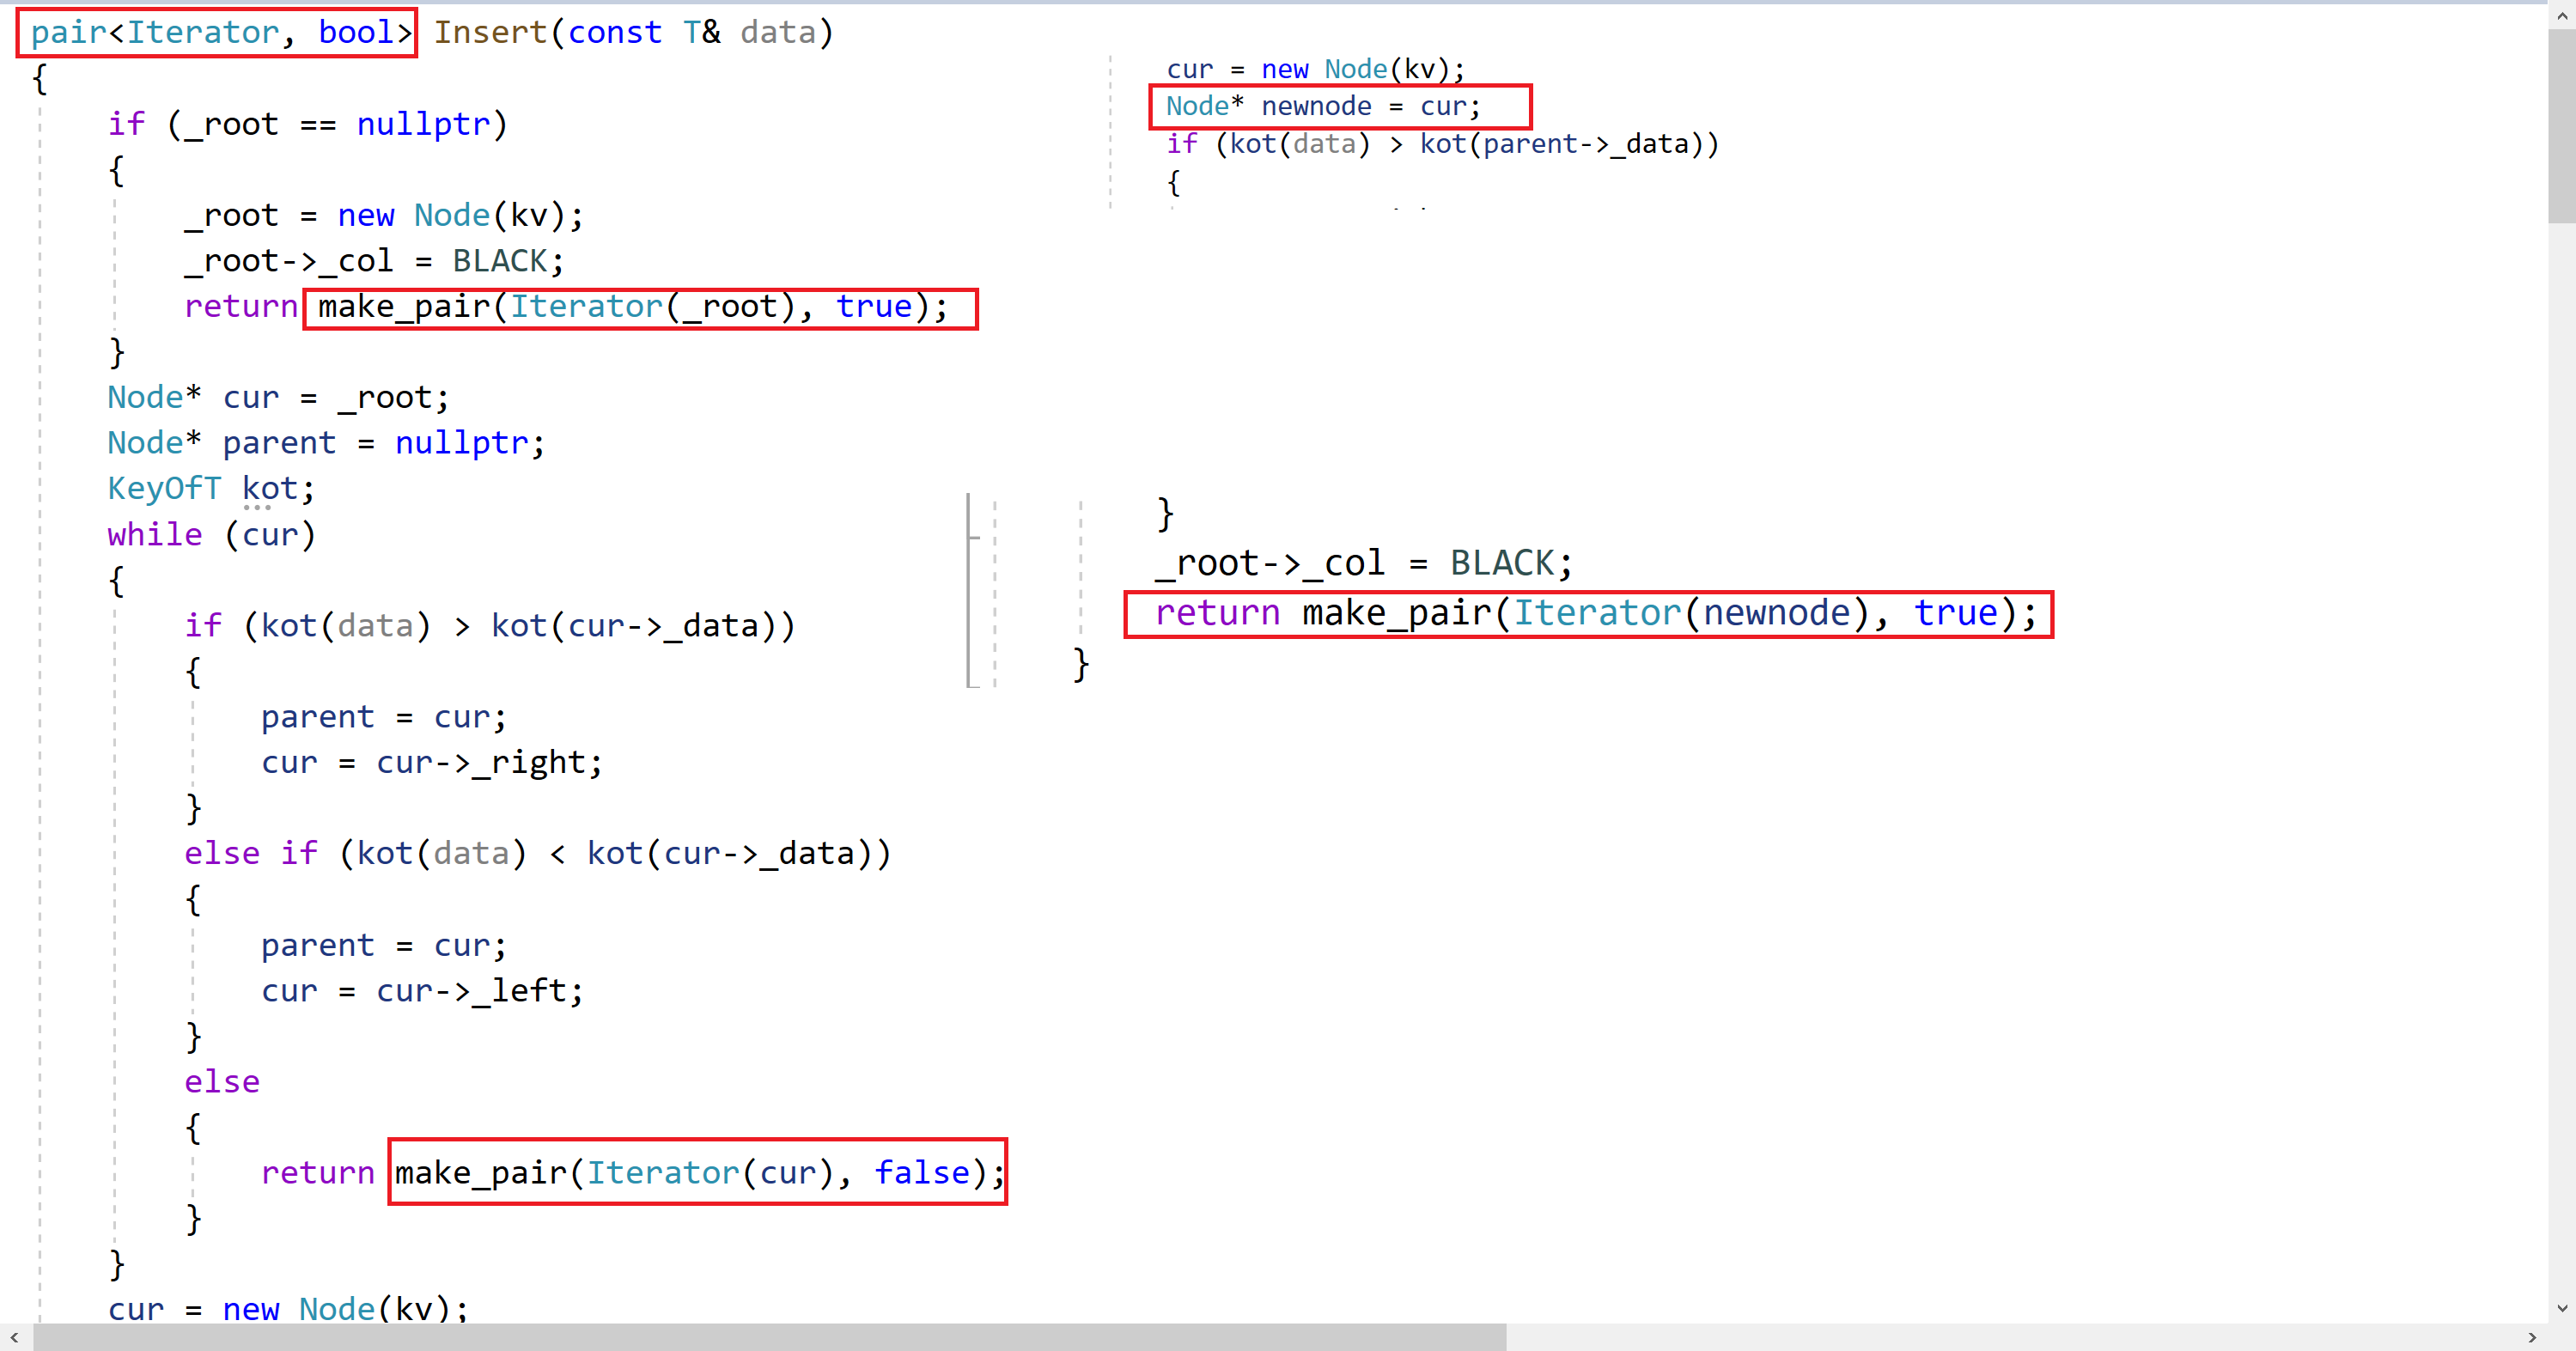
Insert函数,我们要改变它的返回值,返回值是pair:
- 如果插入成功,返回插入节点所在的迭代器;
- 如果插入失败,返回K值相等的节点的迭代器。
- 如果要进行旋转,要先记录一下当前cur的节点,因为旋转后cur的节点可能就不是我们新插入的节点了。
5. 拷贝构造、析构、赋值重载
⏳析构函数⌛
析构函数要用后序,这样更为简单:
~RBTree()
{
	Destroy(_root);
}
void Destroy(Node* root)
{
	// 左右根的顺序进行析构
	if (root == nullptr)
	{
		return;
	}
	Destroy(root->_left);
	Destroy(root->_right);
	delete root;
}
⏳拷贝构造⌛
拷贝构造要用先序:
RBTree(const RBTree& t)
{
	_root = Copy(t._root);
}
Node* Copy(Node* root)
{
	if (root == nullptr)
		return nullptr;

	Node* newroot = new Node(root->_data);
	newroot->_col = root->_col;
	newroot->_left = Copy(root->_left);
	if (newroot->_left)
		newroot->_left->_parent = newroot;
	newroot->_right = Copy(root->_right);
	if (newroot->_right)
		newroot->_right->_parent = newroot;
	return newroot;
}
⏳赋值重载⌛
下面是现代写法,之前讲过:
const RBTree& operator=(const RBTree t)
{
	swap(_root, t._root);
	return *this;
}


